
Below tutorial will explain you the steps to load files into database
Step 1: Open Talend
·
Create new project or open already
existing project
Step2: create sample csv
files
·
File1,File2,File3,File4
·
They are same format or schema

·
Create one new folder name as’ fileprocessfolder’ and put all files in it. I can access the files from this folder.

Step3: Create new a new
job in Talend
·
Right click on the job designs in the
repository window and select the ‘create job ‘option.
·
Name of the job is’ filelist_fullload’.

·
Click on finish button
Step4: create metadata for one sample file
·
Go to repository window, click on
arrow next to ‘metadata’ and right click on File delimited select the ‘create
file delimited’.

·
Enter example name like’file_process’
click on next button.

·
Add metadata file to repository
·
Click on the browse button, select the
sample file’file1’, Click on next button

·
In this screen select field separator field
click on corresponding combo box
select ‘comma’ option instead of
semicolon
and
select check box for set heading row as column, click on refresh for preview,
click on next button.

·
In this screen click on the finish
button, automatically window will be close.

Step5:
creation of database connection using Mysql database
·
If we have already database connections for loading data into target table no need to create one more database
Connection, just use existed database
connection and by the given credentials.
·
If we don’t have
data base connection, just follow the below steps to create new database
connection.
·
Step-1
·
Go to Mysql
database --->enter valid password ---> after Mysql prompt open create
database using commands like
·
Mysql> create database targetdb; here targetdb is new
database name

·
After creation of
new database we can grant all permissions to that data base.
·
Using this command
we can grant all permissions to the DB.
·
Mysql> grant
all on database name.* to username@’%’ identified by ‘password’.

·
Step-
2
·
Go to Talend repository window --->click on
arrow next to ‘metadata’ --->right click on DB Connections-->select
Create connection option.

·
After click on
that new database connection window opened ,in that step one we can give the name
of the database click on next button.

·
In the second step
we can select desire database type and version of the database ,fill the all options with valid credentials
After check that for DB connection success
or failure, click on check button. If creation is successful just click finish
button.

·
Here I use this
database only to load the result data. Like ‘Target database’.
Step6: design sample job
·
In step3 already I
created one job with ‘filelist_fullload’.
·
Go to repository
window --->click on arrow next to ‘job design’--->right click on’
filelist_fullload’ job select ‘edit job’ option.

·
Go to
metadata---> click on the file delimited
select which file we can use
as a input file ,drag and drop it on
job design console

·
Click on ok
button.
·
Go to right side
panel palette ---> in that search mode option just type
tMap and press enter key , we can
get tMap component, drag and drop it on job design window.
·
Right click on
the ‘file process’ component
,select row----->main connect a row
to the tMap component

·
Again go to right
side panel palette---> in that search mode option type tMysqloutput ,press enter key, we can
get that component, select that
component drag and drop it on job design window.

·
Now we can arrange
the all components in proper order, why because we design somewhat easily and better way to give
the connections etc.,


Step7:
component settings for sample job
·
For easily
understanding purpose I run this sample job, mainly
we can identify difference between the normal job and iterate to load multiple
files in single job.
·
First I
can set the three component properties
one by one
·
double click on ‘File
process’ component we can get
basic-settings in the bottom of the job design window
·
Here we don’t need
to change settings, why because already we gave at the time of creating
metadata.

·
Now I go to tMap
settings, double click on that we can get a new window.

·
I can select all
the columns from the row1 (here row1haveing input file or source file) ,drag
and drop it over on ‘loadallfiles’ (here it is output ).
·
Here it is
optional select columns based on our requirement we can select columns.

·
And also here we
have more options ,to change the data types ,length size of the columns, if add more columns, or remove existed
columns on both sides (input, output), etc.,

·
Click on ok button
close the tamp settings window.
·
tMysqloutput
settings
·
Double click on
the tMysqloutput component we can get basic settings in built-in mode.

·
Now we change the
property type into repository, automatically
all options filled with valid credentials except table name, here i can
enter manually, like”fileprocess”.
·
And also I change
the option action on table “create table if not exist”. It creates the table in
target database if it doesn’t have previously.

Step8: Run the sample job
·
click on run
button or press F6 button from keyboard, it can run the job automatically , it
can display the job execution starting time and ending time ,status of the job.

step9:
design job using tFlelist component
·
Here I can
continue with previous job
‘filelist_fullload’
·
Go to
palette--> type manually tFlelist in search box ---> select that
component drag and drop it over on left side
above corner of job design window
.

·
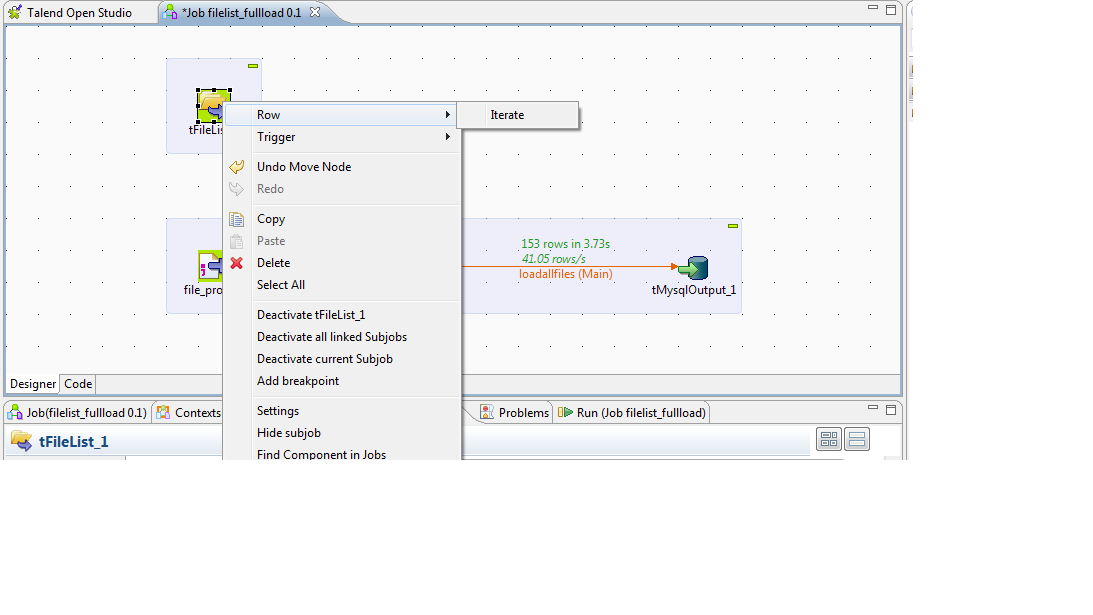
Right click on tFilelist
select row--->iterate, connect that row to input metadata file component
“file_process”.
·
tFilelist settings
·
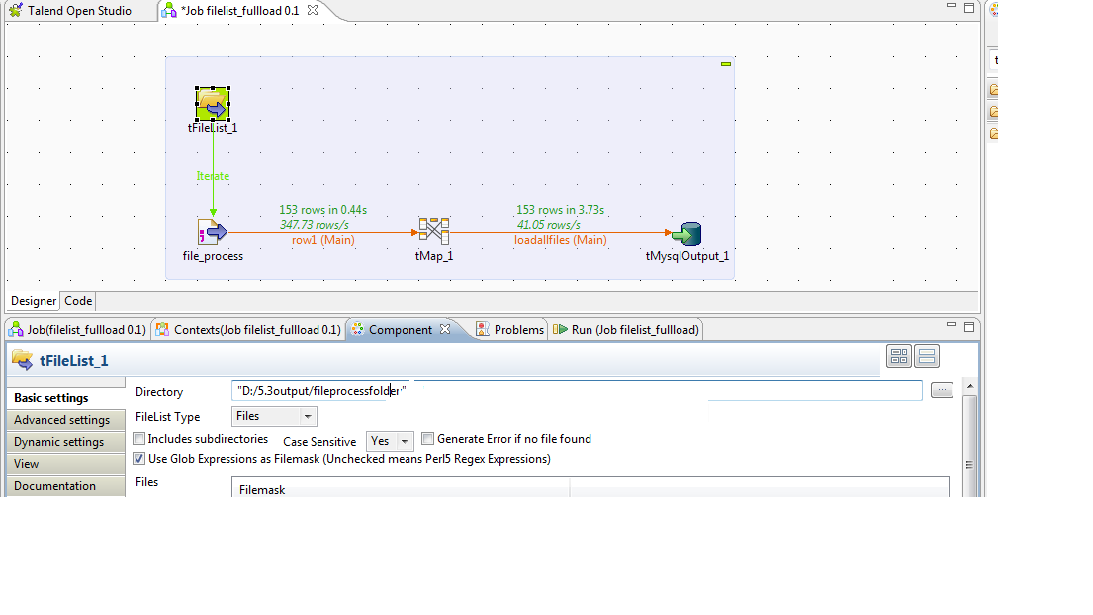
Double click on
tFilelist component, we can get basic settings under the job design window
screen.

·
In basic settings
i can change directory, like this "D:/5.3output/fileprocessfolder.csv",
input processing files are located in this directory.
·
Metadata input
file component settings, here I used ‘file_process’ for that.
·
Double click on
that component, change the property type repository ---->>built in, and change
filename/stream like this ((String) globalMap.get ("tFileList_1_CURRENT_FILEPATH").

·
Tamp settings
·
No need to any
changes old settings
·
tMysqloutput
component settings.
·
Double click on
component --->go to basic settings ---> change table name, why because
that name I already used in previous job and move to --->action on table
select one action based on our requirement.

·
Run the job
·
Click on run
button or press F6 from keyboard.
·
Job executed
successfully.


